In part 1 of this series on building a gaming steering wheel from an Arduino I installed and tested the library that I’ll be using. In this part I build and test the circuit that the controller will use. I’m quite new to electronics and I thought this would be a challenge but it turned out to be surprisingly simple.
At it’s most basic a steering wheel controller needs to provide analogue steering, accelerator and brake inputs. Ideally it will also have buttons for the handbrake, gear up and gear down, everything after that is icing on the cake. For this steering wheel I’ll provide the basic controls and five buttons. If you want more buttons it’s trivial to add them later, the Pro Micro has another seven free pins that could be wired directly to buttons.
Steering Wheel Circuit
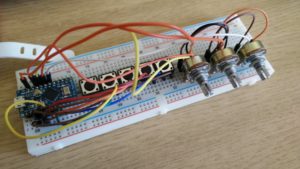
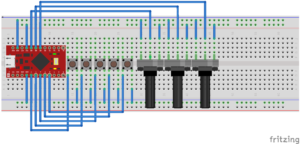
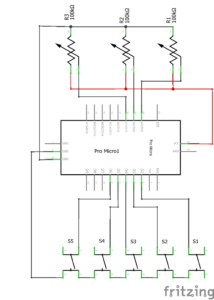
I suggest you initially build your circuit on a breadboard to check that you’ve got a good understanding of what goes where. After a bit of playing about I came up with the circuit shown below which I then drew up in Fritzing.


As you can see the circuit is remarkably simple. The buttons are wired from pins 2 through 6 to a common ground. The potentiometers have common 5v (Vcc) and common ground connections and the middle pin is wired to analogue pins A1 through A3.
Steering Wheel Code
The code for this controller is also remarkably simple as the joystick library does all the heavy lifting. All my code has to do is read off the button states and axis positions and set them in the Joystick object. Note that the device doesn’t show up as a game controller when set up as a steering wheel, it still works (in Dirt 3 at least).
To read an axis use a couple of likes of code like this:
int steeringPosn = analogRead(A3);
Joystick.setSteering(steeringPosn);
As the buttons are in sequential numerical order I used a loop to read the state:
for (int i = 0; i < BUTTON_COUNT; i++)
{
  int buttonState = !digitalRead(i + BUTTON_OFFSET);
  Joystick.setButton(i, buttonState);
}
The full source code can be found here: SteeringWheelSource.ino
Testing
Now everything is wired up and the code written it’s time to test the controller. In the Devices and Printers window right click on your controller and select Game Controller Settings